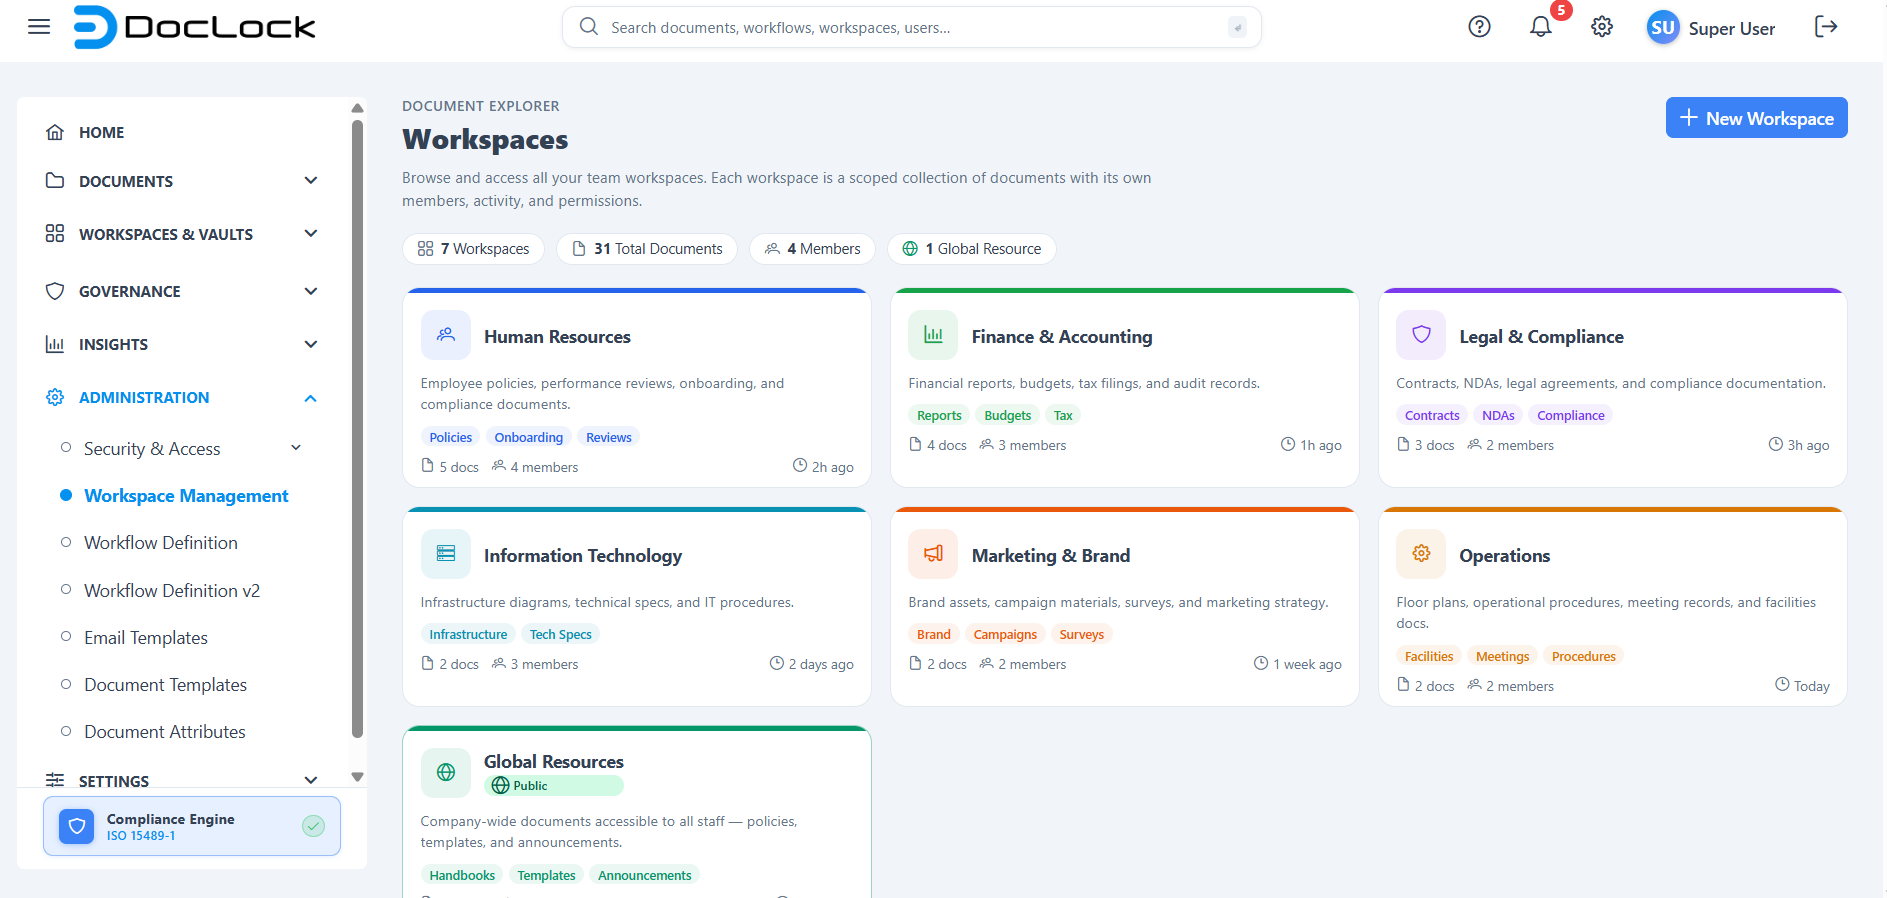
All Workspaces
The All Workspaces screen is your starting point in the Document Explorer. It shows every workspace you can access as a grid of cards, so you can quickly find a team area, see how active it is, and jump straight into its documents.
A workspace is a scoped collection of documents that has its own members, activity, tags, and permissions — for example Human Resources, Finance, or Legal.
How to open this page
From the left navigation menu, open Document Explorer → Workspaces.
- Access required: You need permission to view documents (
DOCUMENTS.VIEW). If you don't see this page in the menu, contact your administrator.
What you see on this page
1. Page header
At the top you'll find the page title Workspaces with a short description, and a New Workspace button on the right for creating a new workspace.
2. Summary stats strip
A row of quick-summary pills shows totals across all your workspaces:
| Stat | What it means |
|---|---|
| Workspaces | How many workspaces you can access. |
| Total Documents | The combined number of documents across those workspaces. |
| Members | The size of the largest workspace team (highest member count). |
| Global Resources | How many workspaces are shared company-wide (public). |
3. Workspace cards
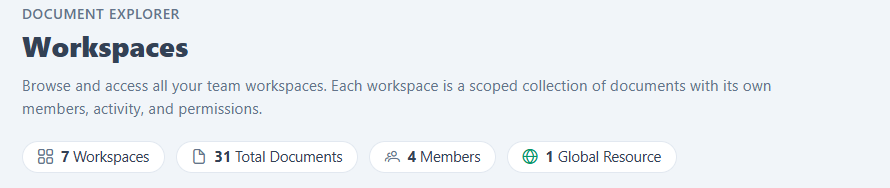
Each workspace appears as a card. A card shows:
- A colored icon and the workspace name.
- A green Public badge if the workspace is a company-wide (global) resource.
- A short description of what the workspace contains.
- Up to three tags. If there are more, a +N chip appears — hover it to see the rest.
- A stats row with the document count, member count, and last activity time.
- For public workspaces, a "View & Download only" note, meaning you can read and download but not change its contents.
While the page is loading, you'll briefly see placeholder "skeleton" cards before the real workspaces appear.
Opening a workspace
Click anywhere on a workspace card to open it. You'll be taken into that workspace, where you can browse and work with its documents.
Screenshot Placeholder: Cursor hovering a card, showing the hover highlight.
Creating a new workspace
- Click the New Workspace button in the top-right of the page.
- In the dialog that opens, fill in the details:
- Short Name (required) — a brief label, e.g.
HR. - Full Name (required) — the complete name, e.g.
Human Resources. - Description (optional) — explain what kind of documents will live here.
- Tags (optional) — type a tag and press Enter (or click the + button) to add it. Click the × on a tag chip to remove it.
- Icon — pick an icon that represents the workspace.
- Color — pick a color; it's used for the card icon and top bar.
- Short Name (required) — a brief label, e.g.
- As you type, the preview banner at the top of the dialog updates so you can see how the workspace will look.
- Click Create Workspace to save.
You'll see a confirmation message, and the new workspace card appears in the grid right away.
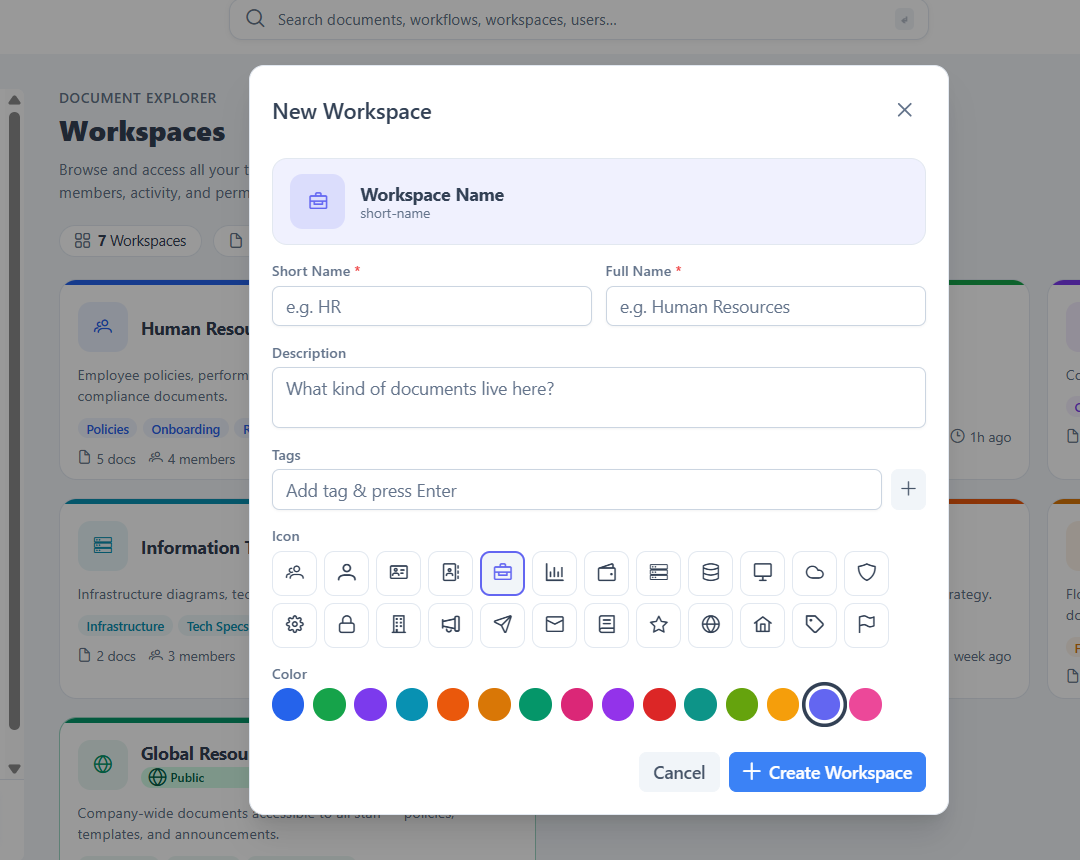
Note: Short Name and Full Name are required. If either is empty, the field is highlighted and the workspace is not created until you fill it in.
Editing a workspace
- Move your mouse over the workspace card you want to change.
- Click the pencil (Edit) button that appears in the top-right corner of the card.
- The dialog opens pre-filled with the workspace's current details.
- Update the name, description, tags, icon, or color as needed.
- Click Save Changes.
A confirmation message appears and the card updates immediately.
Note: The Edit dialog looks the same as the New Workspace dialog above, but the fields are already filled in with the workspace's current details.
The "Global Resources" workspace
Global Resources is a special public workspace that is available to everyone in the organization. Use it for company-wide content that all staff should be able to read — such as employee handbooks, document templates, policies, and announcements.
Key things to know:
- It is marked with a green Public badge and appears in the Global Resources count on the stats strip.
- For most users it is read-only: you can view and download its documents, but not edit or delete them. This is shown by the "View & Download only" note on the card.
- Because it is shared with the whole organization, only authorized administrators manage its contents — this keeps company-wide documents consistent and trustworthy.
Tip: When you want a document to be visible to everyone, it belongs in Global Resources rather than in a team workspace, which is limited to that team's members.
Tips
- Use clear tags so teammates can recognize a workspace's purpose at a glance.
- The last activity time helps you spot which workspaces are active and which are dormant.
- Workspaces marked Public / Global Resources are read-only for most users — use them for company-wide handbooks, templates, and announcements.
Troubleshooting
| Problem | What to check |
|---|---|
| The page or menu item isn't visible | You may not have the DOCUMENTS.VIEW permission — contact your administrator. |
| A workspace you expect is missing | You may not be a member of it; ask the workspace owner to add you. |
| The Create Workspace button does nothing | Make sure Short Name and Full Name are both filled in. |
| Changes don't seem to save | Re-open the workspace and confirm; if the issue persists, refresh the page and try again. |