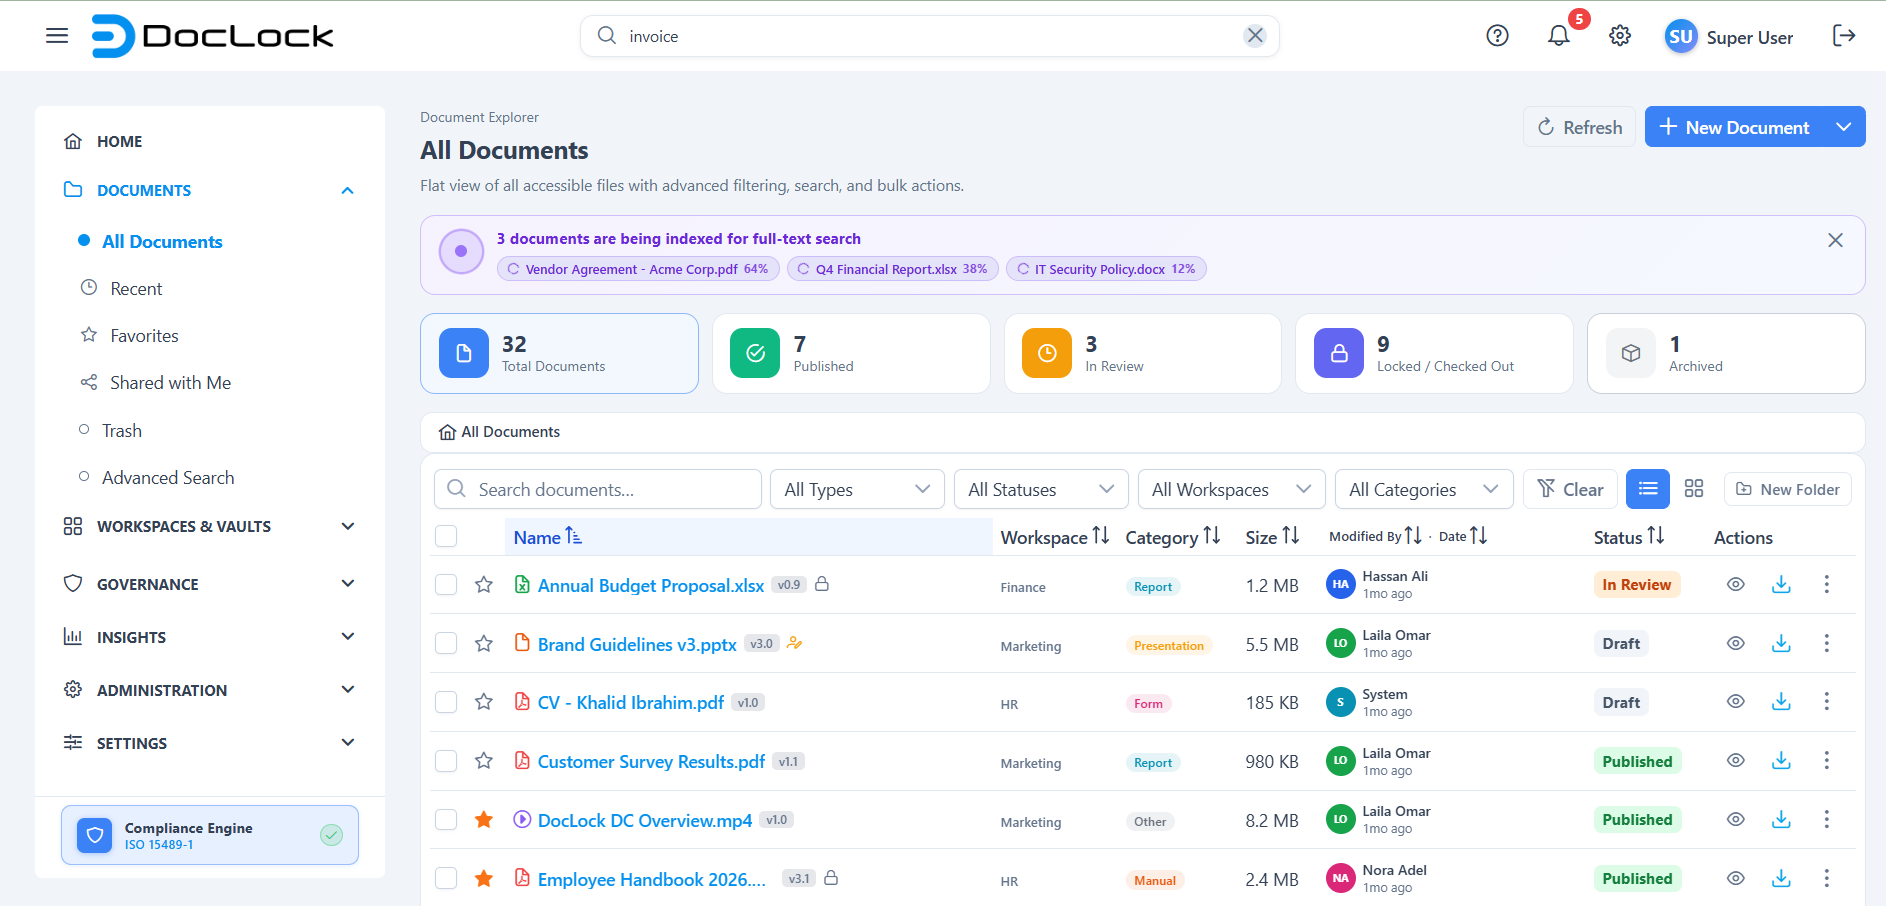
All Documents
The All Documents screen is the main library view in the Document Explorer. It brings every document you can access into one place, with a status summary at the top and a powerful table you can search, filter, sort, and act on. From here you can upload new files, start documents from a template, organize folders, and open any document to see its details.
How to open this screen
From the left navigation menu, open Document Explorer → All Documents, or go directly to the
route documents/all.
- Access required: permission to view documents (
DOCUMENTS.VIEW). If you don't see this page in the menu, contact your administrator.
What you see on this page
1. Page header
At the top you'll find the All Documents title with a short description, plus two actions on the right:
- Refresh — reloads the document list and the status counts.
- New (a split button) — click the main part to open the Upload Documents dialog, or click the arrow for more options such as starting from a template.
2. Status summary strip
A row of cards shows live counts and doubles as a quick filter. Click a card to filter the table to just those documents; click Total to clear the filter.
| Card | What it shows |
|---|---|
| Total | Every document you can access. |
| Published | Documents in the Published status. |
| In Review | Documents currently In Review. |
| Locked | Documents that are locked. |
| Archived | Documents that have been archived. |
When a card is active it is highlighted, and the table below shows only the matching documents.
3. The document table
The main area is the reusable document table. It includes:
- A breadcrumb bar that starts at Home so you can see and navigate the folder you're in.
- A toolbar with a search box and File Type, Status, Workspace, and Category filters, a Clear button, a Table / Grid view toggle, and a New Folder button.
- Columns for Name, Workspace, Category, Size, Modified By · Date, and Status, plus a star column and an Actions column.
- A paginator at the bottom (choose 10, 25, 50, or 100 rows per page).
Each row shows helpful badges: a version badge, an envelope icon for files imported from email, a lock or checked-out icon, and a red Legal Hold badge when a document is frozen. Folders show how many items they contain.
Finding documents
- Type in the search box to match by name. Results update as you type.
- Narrow further with the File Type, Status, Workspace, and Category dropdowns.
- Click any column header (such as Name or Status) to sort by it.
- Click Clear to remove all filters and the search term.
- Switch between Table and Grid views using the buttons on the right of the toolbar.
Tip: The status cards and the toolbar filters work together — for example, click In Review and then pick a Workspace to see only that team's in-review documents.
Uploading documents
- Click New in the page header to open the Upload Documents dialog.
- Drag and drop files onto the drop zone, or click it to browse and choose files. You can add several files at once.
- Supported types are PDF, DOCX, XLSX, PPTX, TXT, images, and ZIP, up to 500 MB each.
- Each added file appears as a pill. Click a pill to edit that file's details: Document Name, Version, Workspace, Initial Status, Category, and Tags. Type and file size are detected automatically, and you're set as the author.
- If the system has AI Suggestions for a file, a banner offers a suggested category and tags — click Accept Suggestions to apply them or Dismiss to ignore.
- If a file name conflicts with an existing one, a Name conflict detected warning appears.
- Click Save (or Save All) to upload. A progress bar runs, and a success message confirms when the files are saved to the current folder.
Starting from a template
In the upload dialog (before you add any files), choose Start from a Template to open the template gallery, pick an approved template, and generate a ready-to-use document with a short wizard.
Working with a document or folder
- Open a document: click its name to open the inline preview, or use the row actions.
- Star (favorite): click the star in the first column to add or remove a document or folder from your favorites. See Favorites.
- Preview / Download: use the eye and download icons in the Actions column.
- More actions: click the ⋮ (more) button on a row for the full menu — Open, Add to Favorites, Pin to Workspace, Download, Share, Rename, Move to…, Duplicate, Lock/Check Out, Archive, and Move to Trash. Some actions are blocked when a document is under a Legal Hold.
- Organize folders: use New Folder in the toolbar, then right-click a folder for options like New Subfolder, Rename, and Move.
- Bulk actions: tick the checkboxes to select several rows and use the toolbar that appears (Download, Share, Move, Tag, Lock, Archive, Delete).
Tips
- Use the status cards as one-click filters before reaching for the dropdowns.
- Star the documents you return to often so you can find them quickly.
- The Modified By · Date column tells you who last touched a file and when.
- A red Legal Hold badge means the document is frozen — editing, moving, renaming, archiving, and trashing are blocked until the hold is lifted.
Troubleshooting
| Problem | What to check |
|---|---|
| The page or menu item isn't visible | You may not have the DOCUMENTS.VIEW permission — contact your administrator. |
| A document you expect is missing | Clear the filters and search box; it may also live in a workspace you can't access. |
| Save is greyed out in the upload dialog | Add at least one file — the button stays disabled until a file is selected. |
| Rename / Move / Archive is disabled on a row | The document is under a Legal Hold; it must be released first. |
| Counts look out of date | Click Refresh in the page header to reload the list and totals. |